
This guide outlines the steps to allow users or roles from Block 64 (AWS Account ID: 440496705373) to access your AWS account with read-only permissions across specific AWS services, such as EC2, RDS, Billing, EKS, and AWS pricing.
Prerequisites
- You must have Admin privileges in your AWS account.
- You should know the Block 64 AWS Account ID:
440496705373. - You will be setting up a role with read-only permissions to various AWS services.
--------------------------------------------------------------------------------------------------------------
Step-by-Step Instructions
- Login to AWS with Admin Privileges
- Log in to the AWS Management Console using an IAM user or role that has admin-level permissions.
-
Navigate to the IAM Console
- From the AWS Management Console, search for IAM (Identity and Access Management).
- Open the IAM service.
- Create a New Role
- In the IAM Console, on the left sidebar, click Roles under the Access Management section.
- Click on the Create role button.
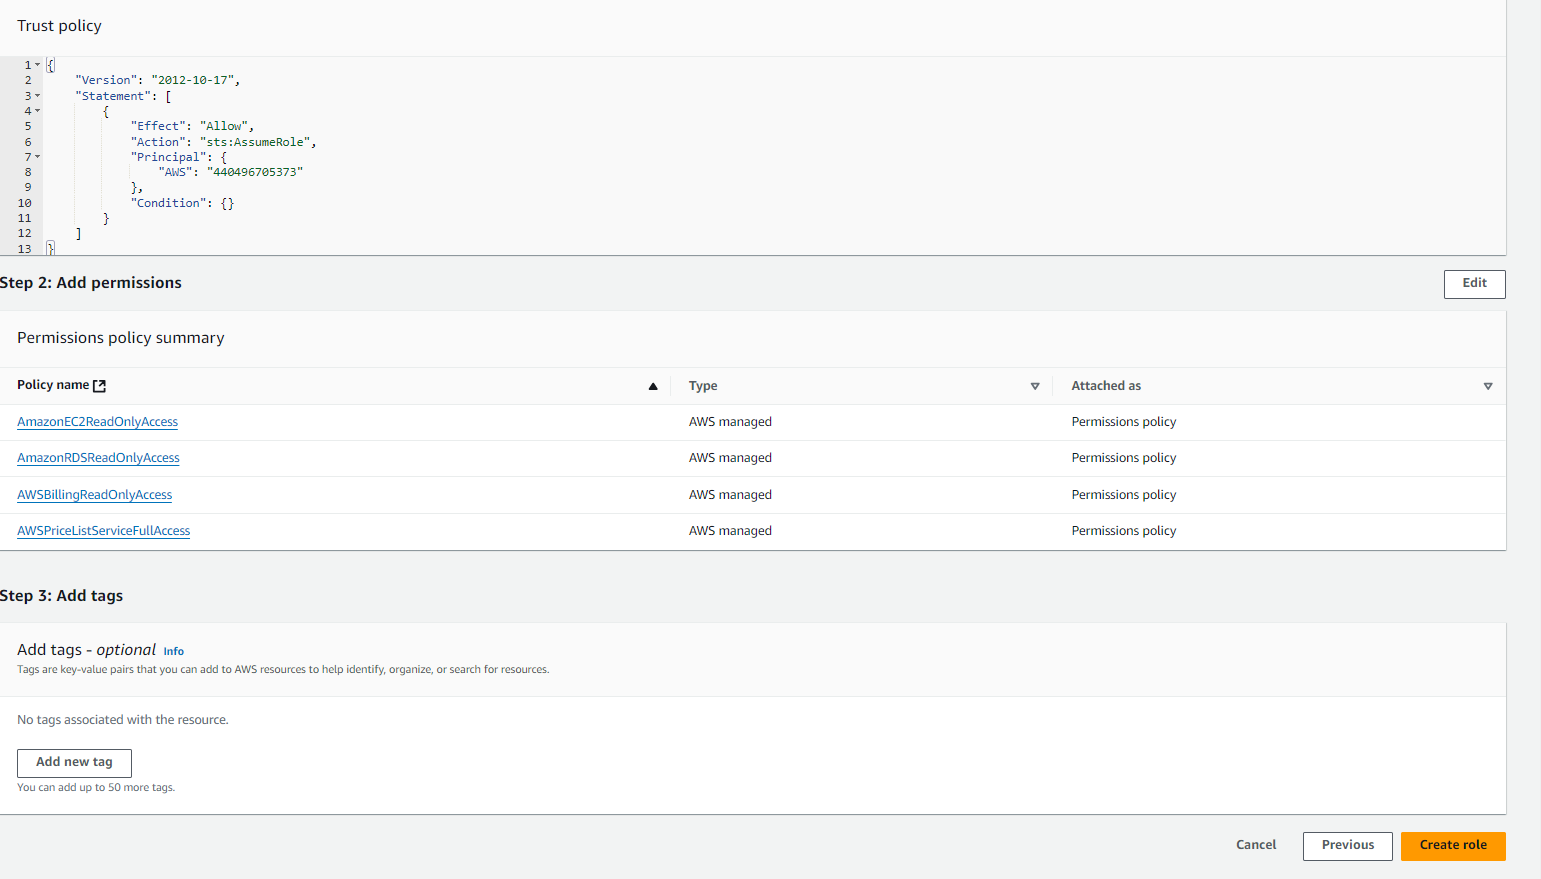
- Specify Trusted Entity
- Under Select trusted entity, choose AWS account.
- Select Another AWS account.
- In the Account ID field, enter Block 64’s account ID:
440496705373. - Ensure that both Require external ID and Require MFA options are not selected.
- Click Next.
- Attach Permissions Policies
- On the Permissions policies screen, search for and select the following permissions, mapped to the corresponding reports for AWS cloud reports in the app:
AmazonEC2ReadOnlyAccess: Grants read-only access to EC2 instances, necessary for the Virtual Machines and Auto Scaling reports in the app.AWSBillingReadOnlyAccess: Allows read-only access to billing information, used for the Cost Details report.AmazonRDSReadOnlyAccess: Grants read-only access to Amazon RDS databases, required for the PaaS Databases report.AWSPriceListServiceFullAccess: Grants read-only access to Amazon RDS instance type details like "Vcpu" and "Ram", required for the PaaS Databases report.
- Select all these policies and click Next.
- On the Permissions policies screen, search for and select the following permissions, mapped to the corresponding reports for AWS cloud reports in the app:
- Assign Role Name
- In the Role name section, provide a descriptive name for the role, such as
Block64ReadOnlyAccess. - Optionally, you can add a description for future reference.
- Click Create role.
- In the Role name section, provide a descriptive name for the role, such as
- Add Inline Policy For EKS
- Once the role is created, navigate to the newly created role.
- Under the Permissions tab, click Add permissions, then select Create inline policy.
- In the JSON tab, paste the following policy, which grants the necessary permissions for the EKS report:
-
{
  "Version": "2012-10-17",
  "Statement": [
     {
        "Sid": "Statement1",
        "Effect": "Allow",
        "Action": [
 "eks:DescribeNodegroup",
 "eks:ListNodegroups",
 "eks:DescribeCluster",
 "eks:ListClusters"
        ],
        "Resource": "*"
    }
  ]
}
-
- Click Next.
- Give the policy a name (e.g.,
EKSReadOnlyInlinePolicy) and click Create policy.
- Copy the Role ARN
- On the Summary section of the role, locate the Role ARN (a string similar to
arn:aws:iam::your-account-id:role/Block64ReadOnlyAccess) 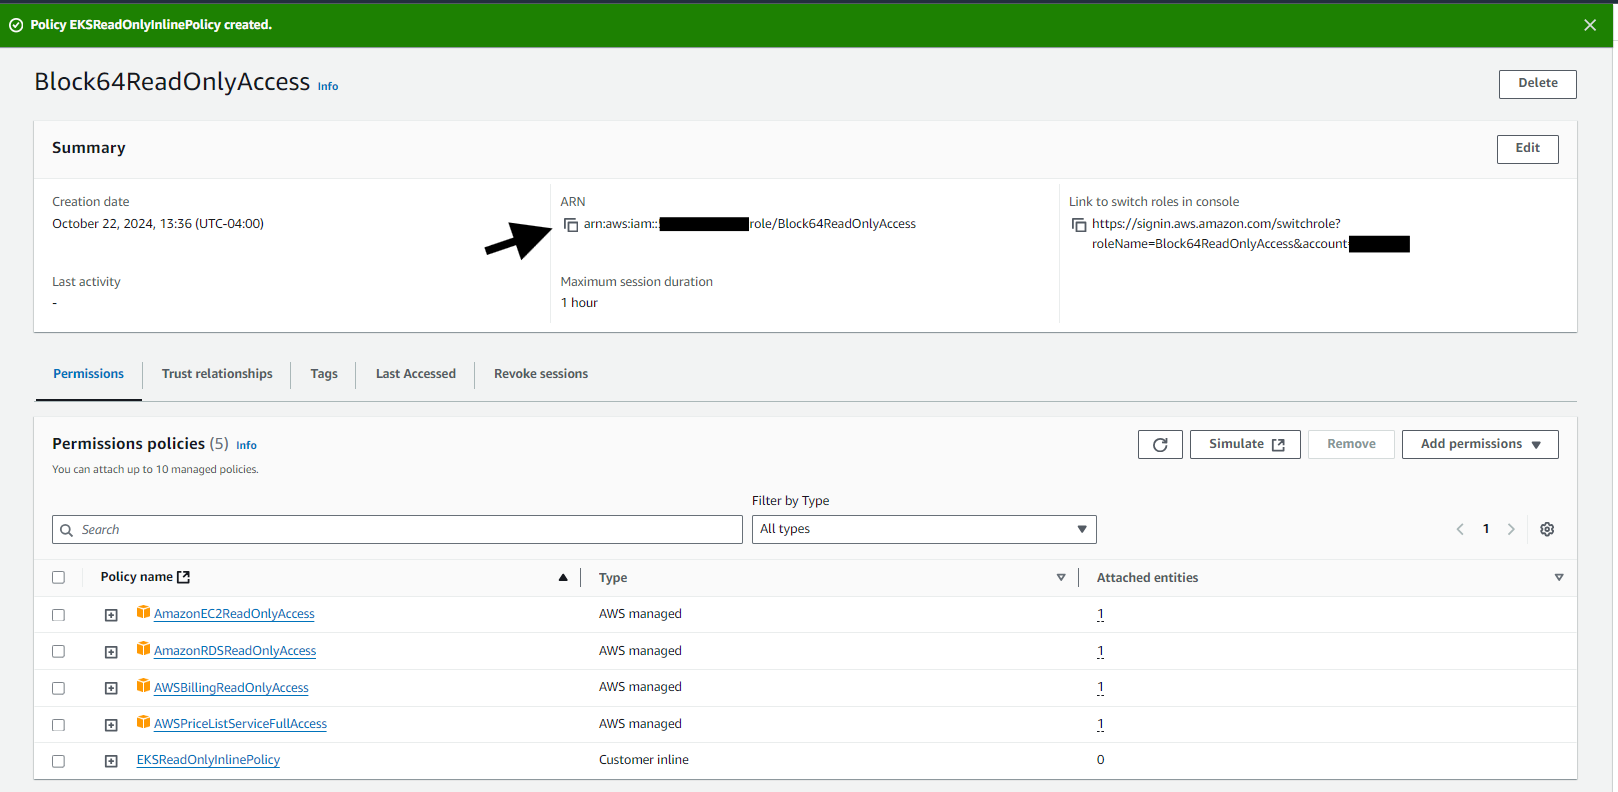
- Copy the Role ARN and share it in Block 64 AWS Manager for inventory credentials.
- On the Summary section of the role, locate the Role ARN (a string similar to
--------------------------------------------------------------------------------------------------------------
Final Notes
- This role grants Block 64 read-only access to multiple AWS services, including EC2, Billing, RDS, and EKS. You can modify the permissions to add or restrict access to other AWS services as needed.
- The Role ARN must be provided to assume the role in your account.
-------------------------------------------------------------------------------------------------------------
Troubleshooting
- If data is not populated on the app, ensure that the Account ID in the trusted entity section is correct.
- Verify that all required permissions, including the inline policy for EKS, have been attached to the role.